Alert Catalog
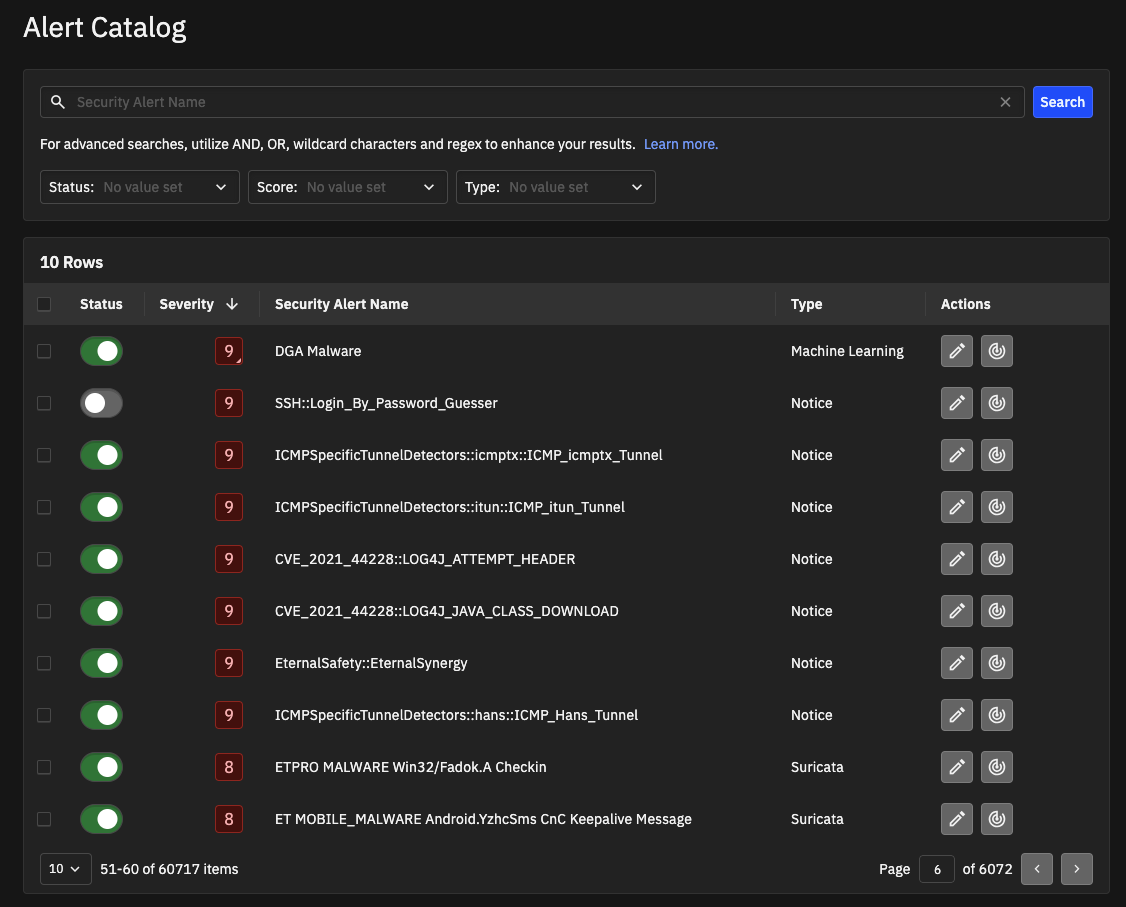
The Alert Catalog is a list of all alert categories in the system. From the Alert Catalog, you can view details about each alert category, enable or disable alert categories, customize severity scores, and define entities to exclude from a category. The Alert Catalog also highlights detection methods for entries. The catalog is available to both analysts and admins.
Accessing the Alert Catalog
From System Settings in the left navigation, choose Alert Catalog.
The Alert Catalog appears as a tab in System Settings.
Search and filters
Before reviewing individual alerts, you can refine the list using the controls at the top of the Alert Catalog page:
Search: Find categories by name using keywords or Kibana query syntax. For details on operators and wildcards, see the Search Guidelines section at the end of this topic.
Status: Filter by Active or Inactive alerts.
Score: Filter by severity (Low, Medium, or High risk).
Type: Filter by detection method (for example, Suricata, YARA, Machine Learning).
Alert Catalog list
For each alert category in the catalog, you can view:
Column |
Description |
|---|---|
Status |
Indicates if the alert is Active or Inactive.
|
Severity |
A standardized threat score from 1 (lowest) to 10 (highest). |
Security Alert Name |
Click the name to view the Details Page, which includes:
|
Type |
The detection method (for example, Machine Learning, Notice, Search Based, Suricata, YARA, or Anomaly). |
Actions |
Quick actions available for the category:
|
Note
When Investigator identifies a Notice, Suricata, or YARA alert that is not yet in the Alert Catalog, it automatically adds it with an Inactive status. You must change the status to Active for it to appear in your dashboard.
Alert Catalog updates
The Alert Catalog is dynamically updated to ensure Investigator utilizes the latest threat detection logic. These periodic updates are managed by Corelight.
The update process follows specific logic to manage new rules while respecting your local configurations:
Update Frequency: Updates are generally pushed on a monthly basis following quality assurance verification.
New Rules (Day 1 Ruleset): The Day 1 ruleset consists of alerts selected for high criticality and low noise. These rules are automatically activated for existing customers. You do not need to manually enable these new rules.
Deprecated Rules: Rules that are no longer recommended, but not permanently deleted, are updated in the catalog with a status of Inactive. They remain visible in the catalog but will not trigger alerts.
Deleted Rules: Rules that are permanently removed from the source repository are removed from your Alert Catalog entirely. They are not archived and are no longer searchable.
Note
Your local customizations are protected. If you disable a rule, future updates will respect that setting and will not automatically reactivate it.
Auto-enable YARA alerts
When Investigator receives a log containing a YARA alert category it has not seen before, it dynamically adds that category to the Alert Catalog. By default, these new YARA alert categories are added with a status of Inactive.
You can specify whether these new categories should be automatically enabled (Active) or remain disabled (Inactive), requiring manual review. Auto-enablement simplifies the process by ensuring that when Investigator identifies a new YARA category, it is immediately set to Active. This allows the system to generate alerts and detections for the new category instantly.
To automatically enable new YARA rules
Click the vertical ellipsis (three stacked dots) in the upper-right corner of the Alert Catalog. A New Rules Settings dialog box appears.
Select Auto-enable all new rules and click Save.
When you enable this setting, it applies to new rules only and does not affect existing entries in the Alert Catalog.
Update multiple alert categories at the same time
You can select multiple alert categories and update their status with a single click. You can select specific entries, all the entries on the page, or all entries across multiple pages. When you select an alert category, a banner appears that provides selection information and options.
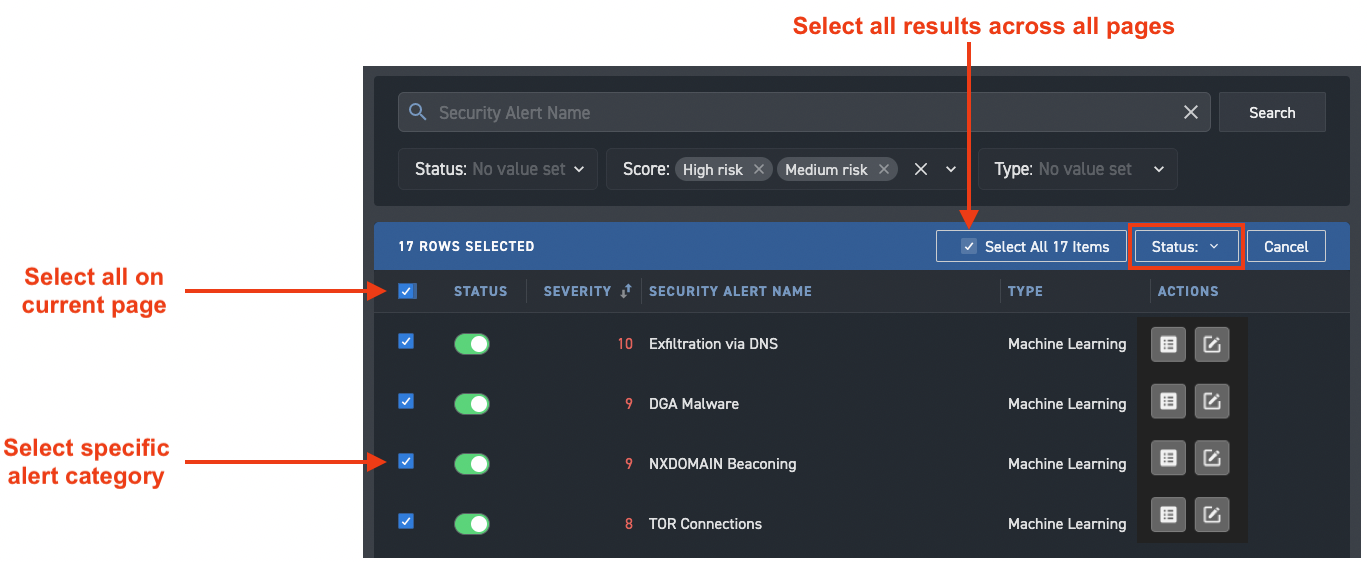
With multiple alert categories selected, use the Status menu to change the status of the selected entries to Active or Inactive.
Tip
Use search and filters to limit the results to make more focused selections.
Exclude entities from an alert category
You can exclude entities from an alert category in the Alert Catalog. Excluded entities do not generate new alerts for the alert category. Typically, you exclude trusted entities so you can focus on other entities.
To exclude an entity from an alert category
From the Alert Catalog, click the name of the alert to display the details page.
In the Excluded Entities section, click + Add New. The right side panel opens.
Choose an Entity Type and enter the corresponding value to identify the entity.
For Notice and Suricata alerts, you can exclude based on the Source IP address or CIDR.
Exclusions for Machine Learning alerts depend on the nature of the alert: some apply to the Source IP, while others (such as DNS alerts) apply to the domain.
Similarly, excluding entities from Search Based alerts depends on the alert definition.
Note
Entity-based suppression applies to the Source IP, except for specific ML models that use domain names instead. It does not apply to both the source and destination entities simultaneously.
Click Save.
Once saved, specified entities do not generate new alerts for the alert category. Investigator tracks and displays the user who excluded the entity and the time/date the entity was added to the exclusion list.
Click the Delete icon in the Actions column to remove excluded entities.
You can also add an entity to the Excluded Entities list through the Suppress Entity button on the Detections, Entity detail, and Alert detail pages. Similarly, you can use the Unsuppress Entity button to remove an entity from the Excluded Entities list from the Entity detail and Alert detail pages.
Exclude entities from all alert categories
Investigator lets admin users globally suppress all alerts for devices identified by an IP address. This helps analysts focus the list of detections by ignoring known, noisy devices (such as security scanners or domain controllers) in the detection queue, and lets analysts focus on more meaningful detections.
To exclude hosts from triggering detections, create a text file with the list of IP addresses to ignore and upload that list to Investigator. When creating the text file, place each IP address to suppress on its own line.
Note
When you suppress alerts and detections for an IP address, the activity for the IP address is still available in the logs and visible in dashboards.
To suppress alerts globally for a device or list of devices
From the Alert Catalog, click Add Global Suppression.
Enter a reason for suppression.
Upload a text (.txt) file that identifies the IP addresses to suppress.
Ensure there is only one IP address per line.
Select the fields for the IP addresses to match.
You can choose Source IP, X-Forwarded-For (XFF), or both.
Click Save.
To make changes to the list of suppressed IP addresses, update the text file. You can simply upload a new version, or download the existing version, make changes, and upload the revised version.
To stop suppressing IP addresses globally, delete the text file with the IP addresses.
If you prefer to suppress an entity for a specific alert category, see Exclude entities from an alert category.
Customize severity scores
Investigator lets you change the severity score of an alert category. A custom score overrides the default score assigned by Corelight. System changes do not override a custom score.
Changing severity scores allows you to:
Prioritize critical incidents: Prioritize incidents that need immediate attention over less severe ones.
Manage false positives: Reduce the significance of alerts that are not indicative of a security incident to prevent them from taking up analyst time.
Elevate important alerts: Increase the score of alerts that are currently too low to warrant immediate attention but should be investigated.
Tune sensitivity: Fine-tune the sensitivity of the alerting system to better match your organization’s risk profile.
To customize the severity score for an alert category
From the Alert Catalog, click the name of the alert category to display the details page.
Click the Edit Score button under the alert category name.
An Edit Score dialog box appears.
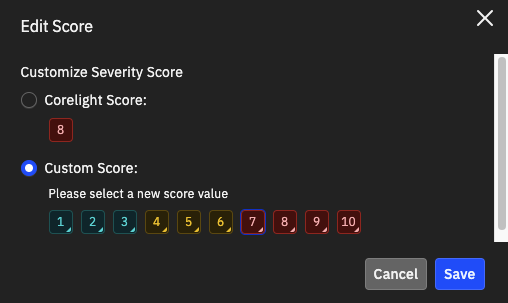
Click Custom Score and click a new score value (10 indicates critical; 1 indicates least important).
Click Save.
The Properties panel on the alert category details page indicates the custom score, and the score icon changes to include a triangle in the lower-right corner. When the custom score is set, all future alerts generated in this category will use the new score.
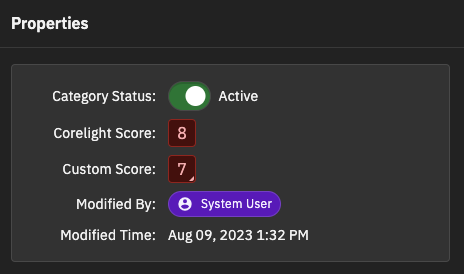
Changes to the severity score appear in the Security Audit, which identifies the user who modified the properties.
You can use the Edit Score button to revert to the default Corelight score or adjust the custom score at any time.
Search the Alert Catalog
You can search the Alert Catalog based on security alert names. The search applies to alert titles only and does not include fields and descriptive content.
The search uses Kibana query language syntax.
Search guidelines
Phrases: Use double quotes (for example,
“test search”) to match an exact string.Operators: Combine sub-queries with
ANDandOR(must be capitalized).Grouping: Use parentheses to group sub-queries.
Wildcards: Use
*to match multiple values.Regex: Use regular expressions to form complex string queries.
Example search terms
malware– finds a single phrase.“et dns”– finds the exact phrase in the double quotes.et AND dns– finds results with both terms.et OR dns– finds results with either one of the terms.(ETPRO MALWARE) AND Payloads– finds results with a compound search term and a single search term.nim AND *2– finds results with the literal phrase (nim) and any other term that ends with a 2./v1.[0-9]/– finds results with a literal string (v1.) followed by a number matching a range of numbers from 0 to 9./mal[a-z]*re/– finds results with a literal string (mal) followed by a letter matching a range of lower-case letters and then a wildcard in the middle adding flexibility and ending with another literal string (re).nim AND /.*2/– finds the first literal term and the results of the regex construct that finds a term that ends with a 2.